Here’s a description how to create your own virtual cockpit panel, similar to https://detes.venus-flytrap.de/panel/. As you have to provide and organize the images and manuals for the panel, there is still manual work to do. Basic knowledge of the command line and tools like nodejs, npm and vuejs is required. If these prerequisites are met however, it is fairly straightforward to create a basic virtual panel which you can extend manually to satisfy all your requirements.
The description is given for a Mac, I assume they will be the same for a Linux machine as both system share the same command line principles. You will need a working installation of Nodejs and git, which you can download and install from https://nodejs.org/en/download/package-manager, and https://git-scm.com/download/mac.
Here we go:
- In you home directory, create a directory
'panelMap'with subdirectories ‚images'and'docs'. ‚images'is where the instrument images go,'docs'is where the instruments‘ manuals go. - take a picture of your cockpit and save a copy in
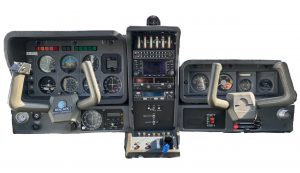
'panelMap/images'with filename'cockpitpanel.jpg'(or'cockpitpanel.png') - navigate to https://www.image-map.net and use ‚Select Image from my PC‘ to upload the image you just stored. Create the panel map by successively adding areas of your instruments using the ‚Add New Area‘ button.

The ‚Link‘ and ‚Target‘ fields can stay empty. The ‚Title‘ field should be filled using the naming convention described below. - Click the ‚Show Me The Code‘ button and store under
'panelMap/panelmap.html'(e.g. by copy & paste).
- collect pictures and manuals of those instruments, for which you want to have popup windows and descriptions in your virtual cockpit panel. Store the pictures under
'panelMap/images',the manuals under'panelMap/docs'. Best use simple names for the instruments. E.g., I use ’stec50′ for the STEC System 50 autopilot or ‚gns430‘ for the Garmin GNS430 navigator. There is no fixed naming scheme required, the only condition is that the filenames of images and docs should be the same without their extension and that they need to coincide with the name tags of the image map created in step above- As an example if you use ‚gns43‘ as a name for your GNS430 navigator in the HTML image map, the image and doc should be named
'gns430.jpg'(or'gns430.png') and'gns430.pdf'respectively
- As an example if you use ‚gns43‘ as a name for your GNS430 navigator in the HTML image map, the image and doc should be named
In the example above the final directory structure of the panelMap folder should look like this:
panelMap
   |--images
   |   |--cockpitpanel.jpg
   |   |--gns430jpg
   |   |--stec50.jpg
   |--docs
   |   |--stec50.pdf
   |   |--gns430.pdf
   |--panelmap.html
once this is done, go to your command line and type:
git clone git@github.com:staski/panel-map.git myPanelMap
cd myPanelMap
npm install
after resolving all dependencies, this will copy the images and manuals to your „project“ directory and create all the required javascript artifacts for your panel map. This is it! When everything worked out, the first version of your virtual panel is ready.
To start a local http server that serves your virtual cockpit panel, simply type:
npm run devUsually, this will start a local server on port 5173, so you access the virtual panel pages at ‚http://localhost:5173‚. If you want to deploy your panel to an external http server, you have to „build“ your project:
npm run buildthis will store all required assets in a folder ‚dist‚. This folder contains a file ‚index.html‚ and a directory ‚assets‚. Simply transfer the content of the 'dist' folder (as is) to the root directory of your http server. If you want to serve your pages from a different location than the root directory of your server, use the following command
npm run build -- --base=<base-directory-path>After having created the initial version of your virtual panel, you would normally enhance it, especially by creating advanced texts and titles for the instruments. The automatically created version simply displays ‚<name>‚ as text and title, where '<name>' is the name of the instrument specified above. Title and texts are provided in a file ‚texts.js' in the src sub-directory of the project. You have to modify this file manually.
If you have any question or comments, please drop me a note @ staski@staski63